🎉 Introduction
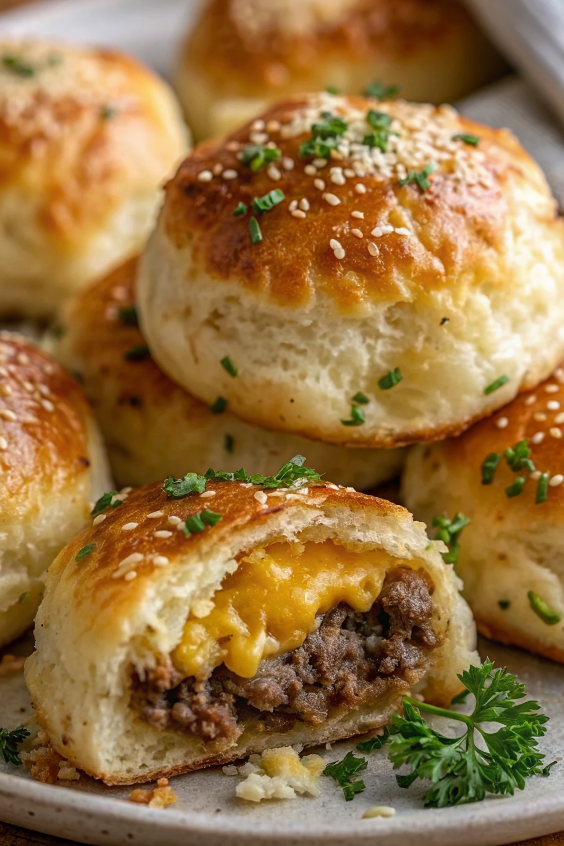
Garlic Parmesan cheeseburger bombs are the ultimate comfort-food appetizer—crispy on the outside, juicy on the inside, and bursting with cheesy goodness. These golden biscuit-wrapped bites are filled with seasoned ground beef, creamy cheeses, and finished with a rich garlic Parmesan butter that makes them completely irresistible.
Perfect for parties, game days, or fun family dinners, these cheeseburger bombs take everything you love about a classic burger and turn it into a handheld, oven-baked delight. They’re easy to prepare, kid-friendly, and guaranteed to disappear fast once they hit the table.
If you’re looking for a crowd-pleasing recipe that’s fun, flavorful, and totally comforting, these garlic Parmesan cheeseburger bombs are a must-try.
🧰 Equipment Needed
- Large skillet
- Baking sheet
- Parchment paper
- Mixing bowl
- Cutting board
- Sharp knife
- Pastry brush
- Measuring spoons
🛒 Ingredients
Beef Filling
- 1 lb ground beef
- 1 teaspoon garlic powder
- 1 teaspoon onion powder
- Salt and black pepper, to taste
Cheese Filling
- 1 cup cheddar cheese, shredded
- ½ cup cream cheese, softened
Dough
- 1 can refrigerated biscuit dough
Garlic Parmesan Topping
- 2 tablespoons butter, melted
- ¼ cup Parmesan cheese, grated
- Fresh parsley, finely chopped
These ingredients come together to create juicy, cheesy, and perfectly seasoned cheeseburger bombs.
👩🍳 Directions
Step 1:
Preheat the oven to 190°C (375°F) and line a baking sheet with parchment paper.
Step 2:
Heat a large skillet over medium heat and add the ground beef.
Step 3:
Cook the beef for 6–8 minutes, breaking it apart, until fully browned.
Step 4:
Season the beef with garlic powder, onion powder, salt, and black pepper. Stir well, then remove from heat and let cool slightly.
Step 5:
In a bowl, mix the shredded cheddar cheese with the softened cream cheese until well combined.
Step 6:
Separate the biscuit dough and flatten each piece into a small circle.
Step 7:
Place a spoonful of seasoned beef in the center of each dough circle.
Step 8:
Top the beef with a spoonful of the cheese mixture.
Step 9:
Carefully pull the edges of the dough up and over the filling, pinching tightly to seal and form a ball.
Step 10:
Place each sealed bomb seam-side down on the prepared baking sheet.
Step 11:
Brush the tops lightly with melted butter.
Step 12:
Bake for 15–18 minutes, or until the bombs are golden brown and cooked through.
Step 13:
Remove from the oven and immediately brush with remaining melted butter.
Step 14:
Sprinkle grated Parmesan cheese and chopped parsley over the hot bombs.
Step 15:
Let cool for 3–5 minutes before serving.
🍽️ Servings & Timing
- Servings: 12–14 bombs
- Preparation Time: 20 minutes
- Cooking Time: 15–18 minutes
- Total Time: About 40 minutes
Perfect for appetizers, snacks, or casual dinners.
🧊 Storage & Reheating
- Refrigerator:
Store leftovers in an airtight container for up to 3 days. - Freezer:
Freeze baked bombs for up to 1 month. - Reheating:
Reheat in the oven until warm and crisp again. Avoid microwaving for best texture.
🥄 Variations
- Extra cheesy: Add more cheddar inside
- Garlic lovers: Add extra garlic powder to the butter
- Crispier top: Sprinkle Parmesan before baking
- Mini size: Use smaller dough portions
- Herb twist: Add dried herbs to the beef
These variations keep the heart of cheeseburger bombs while letting you customize flavor and texture.
❓ 10 FAQs
- Can I use chicken instead of beef?
Yes, ground chicken works well. - Do I need to cook the beef first?
Yes, for safety and best flavor. - Can I make these ahead of time?
Yes, bake and reheat before serving. - Are these kid-friendly?
Absolutely, kids love them. - Can I air-fry them?
Yes, cook until golden and cooked through. - Why seal the dough tightly?
To prevent cheese from leaking out. - Can I double the recipe?
Yes, perfect for parties. - Do they freeze well?
Yes, especially after baking. - What dipping sauces work?
They’re great on their own. - Are these good for leftovers?
Yes, they reheat very well.
🏁 Conclusion
These garlic Parmesan cheeseburger bombs are everything comfort food should be—crispy, cheesy, juicy, and packed with flavor. Easy to make and impossible to resist, they’re perfect for sharing with friends and family or enjoying as a fun twist on a classic burger night. One bite, and they’ll become a new favorite.
Garlic Parmesan Cheeseburger Bombs – Cheesy, Juicy & Irresistibly Addictive
Ingredients
✨ Kitchen Essentials You’ll Love
Quick picks I trust for better results, faster prep, and easier cleanup.
-
🍳View ↗
Lodge Seasoned Cast Iron Skillet
-
⚡View ↗
Instant Pot Duo Plus 9-in-1 Electric
-
🔥View ↗
CHEFMAN Digital Air Fryer XL 10L
Disclosure: As an Amazon Associate, I earn from qualifying purchases at no extra cost to you.
Equipment
Method
- Preheat the oven to 190°C (375°F) and line a baking sheet with parchment paper.
- Heat a large skillet over medium heat and add the ground beef.
- Cook the beef for 6–8 minutes, breaking it apart, until fully browned.
- Season the beef with garlic powder, onion powder, salt, and black pepper. Stir well, then remove from heat and let cool slightly.
- In a bowl, mix the shredded cheddar cheese with the softened cream cheese until well combined.
- Separate the biscuit dough and flatten each piece into a small circle.
- Place a spoonful of seasoned beef in the center of each dough circle.
- Top the beef with a spoonful of the cheese mixture.
- Carefully pull the edges of the dough up and over the filling, pinching tightly to seal and form a ball.
- Place each sealed bomb seam-side down on the prepared baking sheet.
- Brush the tops lightly with melted butter.
- Bake for 15–18 minutes, or until the bombs are golden brown and cooked through.
- Remove from the oven and immediately brush with remaining melted butter.
- Sprinkle grated Parmesan cheese and chopped parsley over the hot bombs.
- Let cool for 3–5 minutes before serving.
Notes
Store leftovers in an airtight container for up to 3 days. Freezer:
Freeze baked bombs for up to 1 month. Reheating:
Reheat in the oven until warm and crisp again. Avoid microwaving for best texture. 🥄 Variations Extra cheesy: Add more cheddar inside Garlic lovers: Add extra garlic powder to the butter Crispier top: Sprinkle Parmesan before baking Mini size: Use smaller dough portions Herb twist: Add dried herbs to the beef These variations keep the heart of cheeseburger bombs while letting you customize flavor and texture. ❓ 10 FAQs Can I use chicken instead of beef?
Yes, ground chicken works well. Do I need to cook the beef first?
Yes, for safety and best flavor. Can I make these ahead of time?
Yes, bake and reheat before serving. Are these kid-friendly?
Absolutely, kids love them. Can I air-fry them?
Yes, cook until golden and cooked through. Why seal the dough tightly?
To prevent cheese from leaking out. Can I double the recipe?
Yes, perfect for parties. Do they freeze well?
Yes, especially after baking. What dipping sauces work?
They’re great on their own. Are these good for leftovers?
Yes, they reheat very well. 🏁 Conclusion These garlic Parmesan cheeseburger bombs are everything comfort food should be—crispy, cheesy, juicy, and packed with flavor. Easy to make and impossible to resist, they’re perfect for sharing with friends and family or enjoying as a fun twist on a classic burger night. One bite, and they’ll become a new favorite.