🎉 Introduction
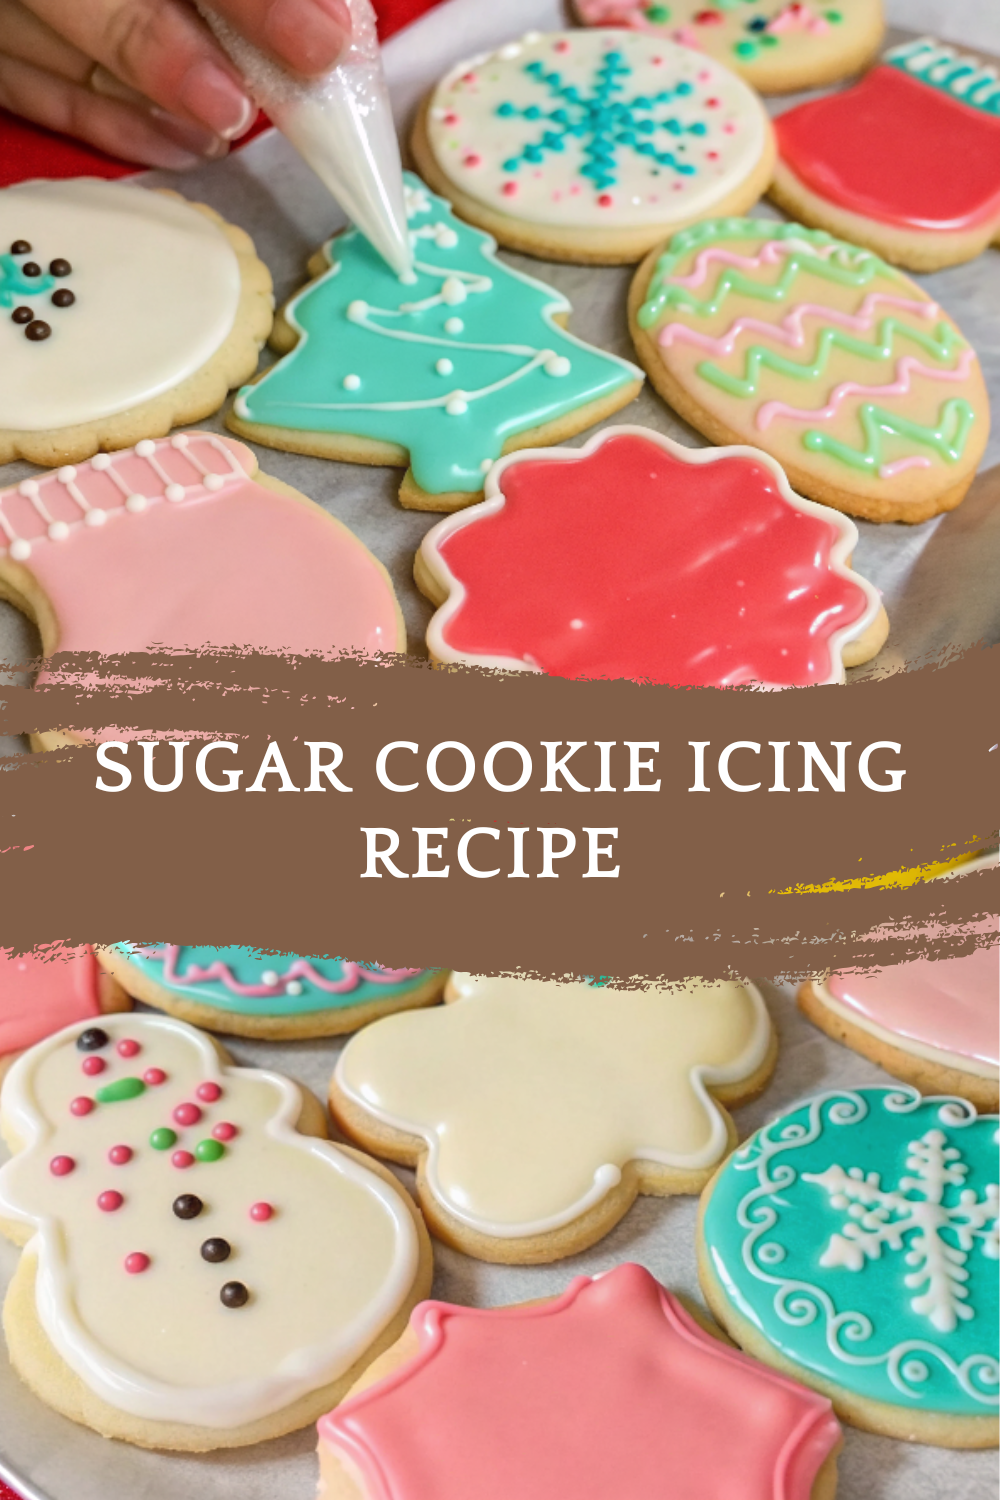
If you’ve ever admired beautifully decorated sugar cookies and wondered how bakers achieve that smooth, glossy, and picture-perfect finish, this Sugar Cookie Icing Recipe is your answer!
This icing is silky, shiny, and sets to a firm, touch-dry finish — perfect for detailed cookie designs, outlines, or festive decorations. It’s made with just a few simple ingredients you probably already have: powdered sugar, milk, corn syrup, and a hint of almond and vanilla extract.
Unlike royal icing, this one is easier to make, needs no meringue powder, and tastes amazing — sweet, creamy, and slightly glossy. It’s ideal for Christmas cookies, Valentine’s hearts, Easter eggs, or any cookie worth showing off!
🧰 Equipment Needed
You’ll only need a few kitchen basics:
- Mixing bowl
- Whisk or hand mixer
- Measuring spoons
- Small bowls (for dividing colors)
- Food coloring (gel or liquid)
- Piping bags or squeeze bottles
- Toothpicks (for detail work)
🛒 Ingredients
Condiments
- 2 tsp Light corn syrup
Dry & Flavoring Ingredients
- 1 cup Confectioners’ sugar (powdered sugar)
- 1/4 tsp Almond extract (or vanilla, if preferred)
- Assorted food coloring (gel or liquid, as desired)
Dairy
- 2 tsp Milk (more if needed for consistency)
👩🍳 Directions
step1:
In a medium bowl, whisk together the confectioners’ sugar, milk, and corn syrup until smooth. Start with 2 tsp of milk and add more, a few drops at a time, if the icing is too thick.
step2:
Add the almond extract and mix well. This gives a light, bakery-style flavor that pairs beautifully with sugar cookies.
step3:
Check the consistency — it should be thick enough to hold shape but fluid enough to drizzle off a spoon.
- For outlining, keep it slightly thicker.
- For flooding (filling), add a few more drops of milk for a smoother flow.
step4:
Divide the icing into separate bowls and tint each with your chosen food coloring. Mix well until the colors are vibrant and even.
step5:
Transfer each color into a piping bag or squeeze bottle.
step6:
Decorate your cooled sugar cookies by outlining the edges first, then filling the centers. Use a toothpick to spread the icing evenly or pop any air bubbles.
step7:
Let cookies dry at room temperature for 8–10 hours (or overnight) until the icing is completely set and glossy.
🍽️ Servings & Timing
- Makes: Enough to frost 20–24 cookies
- Prep time: 10 minutes
- Decorating time: Varies depending on design
- Drying time: 8–10 hours
🧊 Storage & Reheating
- Store unused icing in an airtight container at room temperature for up to 3 days.
- Stir before use — it may thicken slightly.
- Refrigerate for up to 1 week if needed.
- To reuse, bring to room temperature and add a few drops of milk to thin.
🥄 Variations
- Vanilla Icing: Swap almond extract for pure vanilla extract for a classic flavor.
- Lemon Icing: Add a drop of lemon juice or zest for a bright citrus twist.
- Cocoa Icing: Mix in 1 tsp of unsweetened cocoa powder for a chocolate glaze.
- Colored Designs: Use gel-based food colors for intense hues without thinning the icing.
- Glitter Finish: Sprinkle edible glitter or metallic dust on top for a festive shine.
❓ 10 FAQs
1. Does this icing harden?
Yes! It sets firm on top but stays soft underneath — perfect for stacking or gifting.
2. Can I use water instead of milk?
Yes, but milk gives a richer, creamier taste.
3. What does corn syrup do?
It adds gloss and prevents the icing from cracking as it dries.
4. How do I make thick or thin icing?
Add more sugar for thickness or a few drops of milk to thin it out.
5. Can I make it ahead of time?
Yes, store in an airtight container and stir well before using.
6. Is almond extract necessary?
It adds flavor depth, but you can replace it with vanilla or even maple extract.
7. Can I use this for gingerbread cookies?
Absolutely! It sticks well to all firm cookies, including gingerbread.
8. Can I use liquid food coloring?
Yes, but add a bit more powdered sugar if it makes the icing too runny.
9. How long do decorated cookies last?
Up to 1 week at room temperature in an airtight container.
10. Can I freeze decorated cookies?
Yes — freeze in single layers with parchment between cookies to avoid smudging.
🏁 Conclusion
This Sugar Cookie Icing Recipe is the secret to perfectly decorated cookies — smooth, shiny, and easy to apply. With just a few simple ingredients, you can transform plain sugar cookies into beautiful edible art.
Whether you’re baking for Christmas, birthdays, or a special event, this icing will help your cookies look professional and taste divine.
Sugar Cookie Icing Recipe – Glossy, Smooth & Perfect for Decorating
Ingredients
✨ Kitchen Essentials You’ll Love
Quick picks I trust for better results, faster prep, and easier cleanup.
-
🍳View ↗
Lodge Seasoned Cast Iron Skillet
-
⚡View ↗
Instant Pot Duo Plus 9-in-1 Electric
-
🔥View ↗
CHEFMAN Digital Air Fryer XL 10L
Disclosure: As an Amazon Associate, I earn from qualifying purchases at no extra cost to you.
Equipment
Method
- In a medium bowl, whisk together the confectioners’ sugar, milk, and corn syrup until smooth. Start with 2 tsp of milk and add more, a few drops at a time, if the icing is too thick.
- Add the almond extract and mix well. This gives a light, bakery-style flavor that pairs beautifully with sugar cookies.
- Check the consistency — it should be thick enough to hold shape but fluid enough to drizzle off a spoon.
- For outlining, keep it slightly thicker.
- For flooding (filling), add a few more drops of milk for a smoother flow.
- Divide the icing into separate bowls and tint each with your chosen food coloring. Mix well until the colors are vibrant and even.
- Transfer each color into a piping bag or squeeze bottle.
- Decorate your cooled sugar cookies by outlining the edges first, then filling the centers. Use a toothpick to spread the icing evenly or pop any air bubbles.
- Let cookies dry at room temperature for 8–10 hours (or overnight) until the icing is completely set and glossy.
Notes
Yes! It sets firm on top but stays soft underneath — perfect for stacking or gifting. 2. Can I use water instead of milk?
Yes, but milk gives a richer, creamier taste. 3. What does corn syrup do?
It adds gloss and prevents the icing from cracking as it dries. 4. How do I make thick or thin icing?
Add more sugar for thickness or a few drops of milk to thin it out. 5. Can I make it ahead of time?
Yes, store in an airtight container and stir well before using. 6. Is almond extract necessary?
It adds flavor depth, but you can replace it with vanilla or even maple extract. 7. Can I use this for gingerbread cookies?
Absolutely! It sticks well to all firm cookies, including gingerbread. 8. Can I use liquid food coloring?
Yes, but add a bit more powdered sugar if it makes the icing too runny. 9. How long do decorated cookies last?
Up to 1 week at room temperature in an airtight container. 10. Can I freeze decorated cookies?
Yes — freeze in single layers with parchment between cookies to avoid smudging. 🏁 Conclusion This Sugar Cookie Icing Recipe is the secret to perfectly decorated cookies — smooth, shiny, and easy to apply. With just a few simple ingredients, you can transform plain sugar cookies into beautiful edible art. Whether you’re baking for Christmas, birthdays, or a special event, this icing will help your cookies look professional and taste divine.