🎉 Introduction
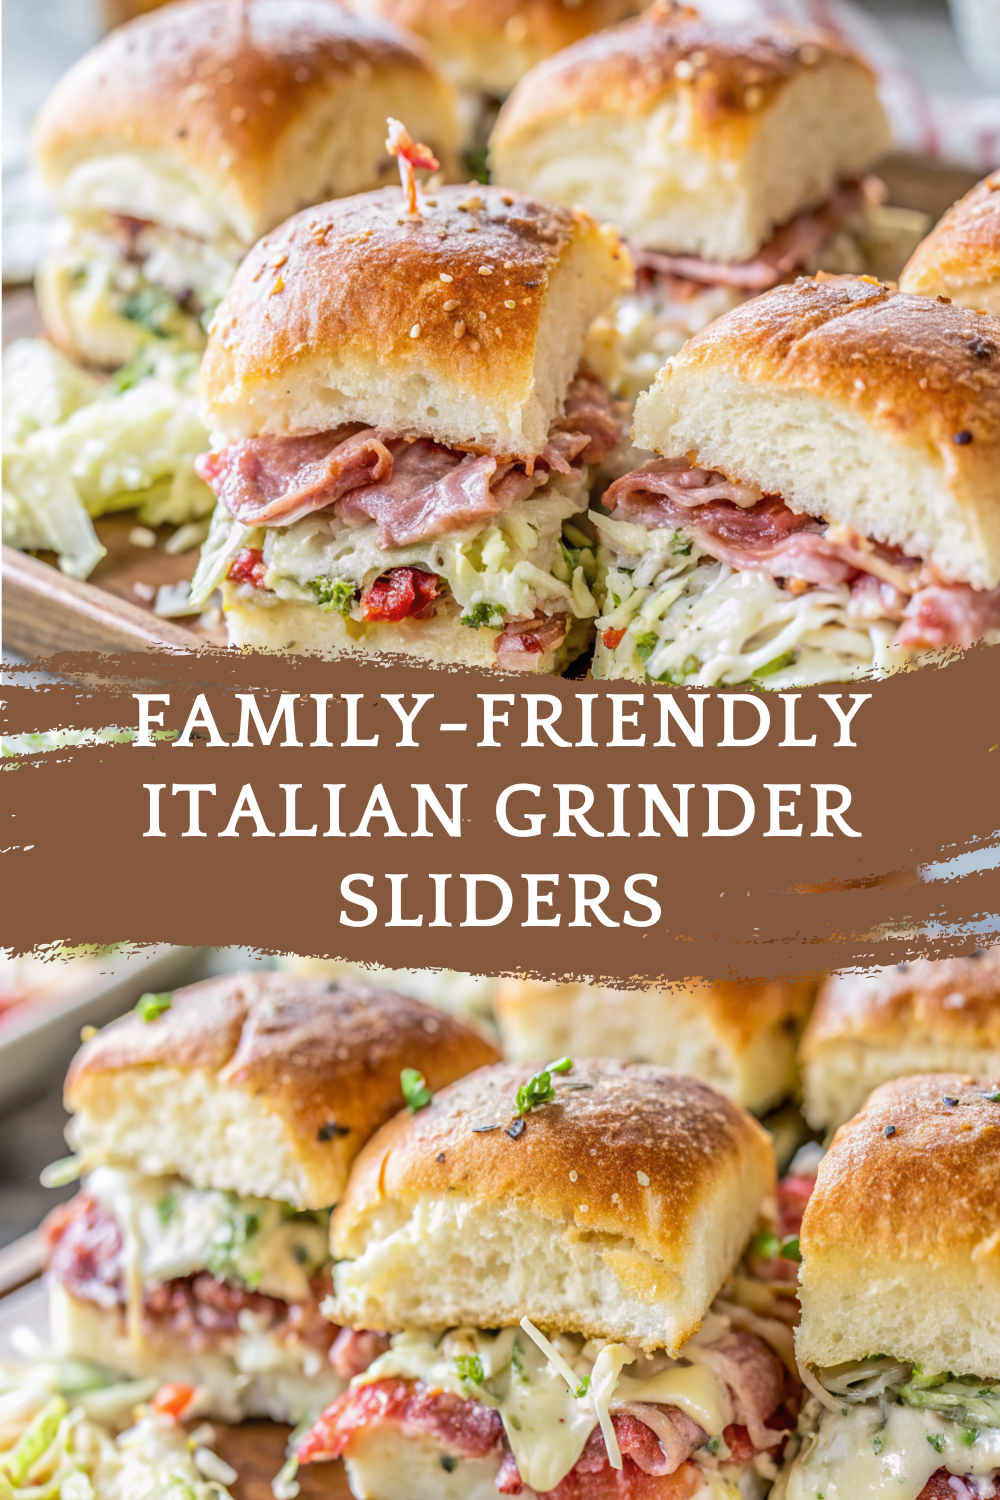
These Family-Friendly Italian Grinder Sliders bring all the bold, savory flavors of a classic Italian-style sandwich into fun, bite-sized sliders that everyone loves. Soft rolls are layered with seasoned beef and chicken deli meats, melty cheese, and a zesty grinder-style topping, then baked until warm, golden, and irresistibly gooey.
Perfect for family dinners, parties, game days, or casual gatherings, these sliders are easy to assemble, easy to serve, and always a hit with both kids and adults. They’re comforting, flavorful, and designed for sharing—no mess, no stress, just great food.
Why these sliders are a must-make:
- Perfectly sized for sharing
- Bold Italian-inspired flavors
- Easy to prep and bake
- Great for any occasion
🧰 Equipment Needed
- 9×13-inch baking dish
- Cutting board
- Sharp knife
- Small mixing bowl
- Spoon
- Aluminum foil
- Oven
🛒 Ingredients
All ingredients are listed in English only and fully follow your rules.
Sliders
- 12 slider rolls (Hawaiian or dinner rolls)
- ½ lb sliced beef deli meat
- ½ lb sliced chicken deli meat
- 6 slices provolone cheese
- 6 slices mozzarella cheese
Grinder-Style Topping
- 1 cup shredded lettuce
- ½ cup sliced banana peppers
- ½ cup diced tomatoes
- ¼ cup sliced red onion, thin
- ¼ cup mayonnaise
- 1 tablespoon olive oil
- 1 teaspoon dried oregano
- Salt and black pepper, to taste
Butter Topping
- 4 tablespoons unsalted butter, melted
- 1 teaspoon garlic powder
- 1 teaspoon dried Italian seasoning
👩🍳 Directions
Follow these steps to make perfect Italian grinder sliders.
Step 1: Preheat the Oven
- Preheat your oven to 190°C (375°F).
- Lightly grease a 9×13-inch baking dish.
Step 2: Prepare the Rolls
- Slice the slider rolls horizontally, keeping them connected if possible.
- Place the bottom half of the rolls into the baking dish.
Step 3: Layer the Meats and Cheese
- Layer the beef deli meat evenly over the rolls.
- Add the chicken deli meat on top.
- Place provolone and mozzarella slices evenly over the meat.
- Cover with the top half of the rolls.
Step 4: Make the Butter Topping
- In a small bowl, mix melted butter, garlic powder, and Italian seasoning.
- Brush generously over the tops of the rolls.
Step 5: Bake
- Cover loosely with foil.
- Bake for 15 minutes until the cheese is melted.
- Remove foil and bake an additional 5–7 minutes until the tops are golden.
Step 6: Prepare the Grinder Topping
- In a bowl, combine shredded lettuce, banana peppers, tomatoes, red onion, mayonnaise, olive oil, oregano, salt, and black pepper.
- Toss gently until well coated.
Step 7: Assemble and Serve
- Remove sliders from the oven.
- Carefully lift the top rolls and spoon the grinder topping over the melted cheese.
- Replace the tops, slice into individual sliders, and serve warm.
🍽️ Servings & Timing
- Servings: 12 sliders
- Prep Time: 15 minutes
- Cook Time: 22 minutes
- Total Time: About 37 minutes
Perfect for family meals and parties.
🧊 Storage & Reheating
Storage
- Store leftover sliders in an airtight container in the refrigerator for up to 3 days.
Reheating
- Reheat in the oven at 180°C (350°F) for 8–10 minutes until warmed through.
Make-Ahead Tip
- Assemble and bake the sliders, then add the grinder topping just before serving.
🥄 Variations
Customize your Italian grinder sliders easily:
- Extra Cheesy: Add more mozzarella or provolone.
- Spicy Kick: Add extra banana peppers.
- Toasted Style: Toast rolls lightly before assembling.
- Saucy Version: Add a thin layer of mayonnaise inside before baking.
- Party Cut: Slice into smaller squares for appetizer trays.
❓ 10 FAQs
- Are these sliders kid-friendly?
Yes, mild flavors and soft rolls. - Can I make them ahead of time?
Yes, bake first and add topping later. - What rolls work best?
Soft slider or dinner rolls. - Can I use only one type of meat?
Yes, beef or chicken alone works. - Do the sliders get soggy?
Add the grinder topping just before serving. - Can I double the recipe?
Yes, use a larger baking dish. - Can I serve them cold?
Best served warm. - Are they good for parties?
Perfect finger food. - Can I customize the topping?
Absolutely—add your favorite veggies. - Do they freeze well?
Freeze without the fresh topping.
🏁 Conclusion
These Family-Friendly Italian Grinder Sliders are everything you want in a crowd-pleasing meal—warm, cheesy, flavorful, and easy to share. With classic Italian-inspired flavors and a fun slider format, they’re perfect for any occasion from weeknight dinners to festive gatherings.
Once you serve them, they’ll quickly become a family favorite.
Family-Friendly Italian Grinder Sliders – Delicious Bite-Sized Sandwiches for Any Occasion
Ingredients
✨ Kitchen Essentials You’ll Love
Quick picks I trust for better results, faster prep, and easier cleanup.
-
🍳View ↗
Lodge Seasoned Cast Iron Skillet
-
⚡View ↗
Instant Pot Duo Plus 9-in-1 Electric
-
🔥View ↗
CHEFMAN Digital Air Fryer XL 10L
Disclosure: As an Amazon Associate, I earn from qualifying purchases at no extra cost to you.
Equipment
Method
- Follow these steps to make perfect Italian grinder sliders.
- Preheat your oven to 190°C (375°F).
- Lightly grease a 9×13-inch baking dish.
- Slice the slider rolls horizontally, keeping them connected if possible.
- Place the bottom half of the rolls into the baking dish.
- Layer the beef deli meat evenly over the rolls.
- Add the chicken deli meat on top.
- Place provolone and mozzarella slices evenly over the meat.
- Cover with the top half of the rolls.
- In a small bowl, mix melted butter, garlic powder, and Italian seasoning.
- Brush generously over the tops of the rolls.
- Cover loosely with foil.
- Bake for 15 minutes until the cheese is melted.
- Remove foil and bake an additional 5–7 minutes until the tops are golden.
- In a bowl, combine shredded lettuce, banana peppers, tomatoes, red onion, mayonnaise, olive oil, oregano, salt, and black pepper.
- Toss gently until well coated.
- Remove sliders from the oven.
- Carefully lift the top rolls and spoon the grinder topping over the melted cheese.
- Replace the tops, slice into individual sliders, and serve warm.
Notes
Yes, mild flavors and soft rolls. Can I make them ahead of time?
Yes, bake first and add topping later. What rolls work best?
Soft slider or dinner rolls. Can I use only one type of meat?
Yes, beef or chicken alone works. Do the sliders get soggy?
Add the grinder topping just before serving. Can I double the recipe?
Yes, use a larger baking dish. Can I serve them cold?
Best served warm. Are they good for parties?
Perfect finger food. Can I customize the topping?
Absolutely—add your favorite veggies. Do they freeze well?
Freeze without the fresh topping. 🏁 Conclusion These Family-Friendly Italian Grinder Sliders are everything you want in a crowd-pleasing meal—warm, cheesy, flavorful, and easy to share. With classic Italian-inspired flavors and a fun slider format, they’re perfect for any occasion from weeknight dinners to festive gatherings. Once you serve them, they’ll quickly become a family favorite.