🎉 Introduction
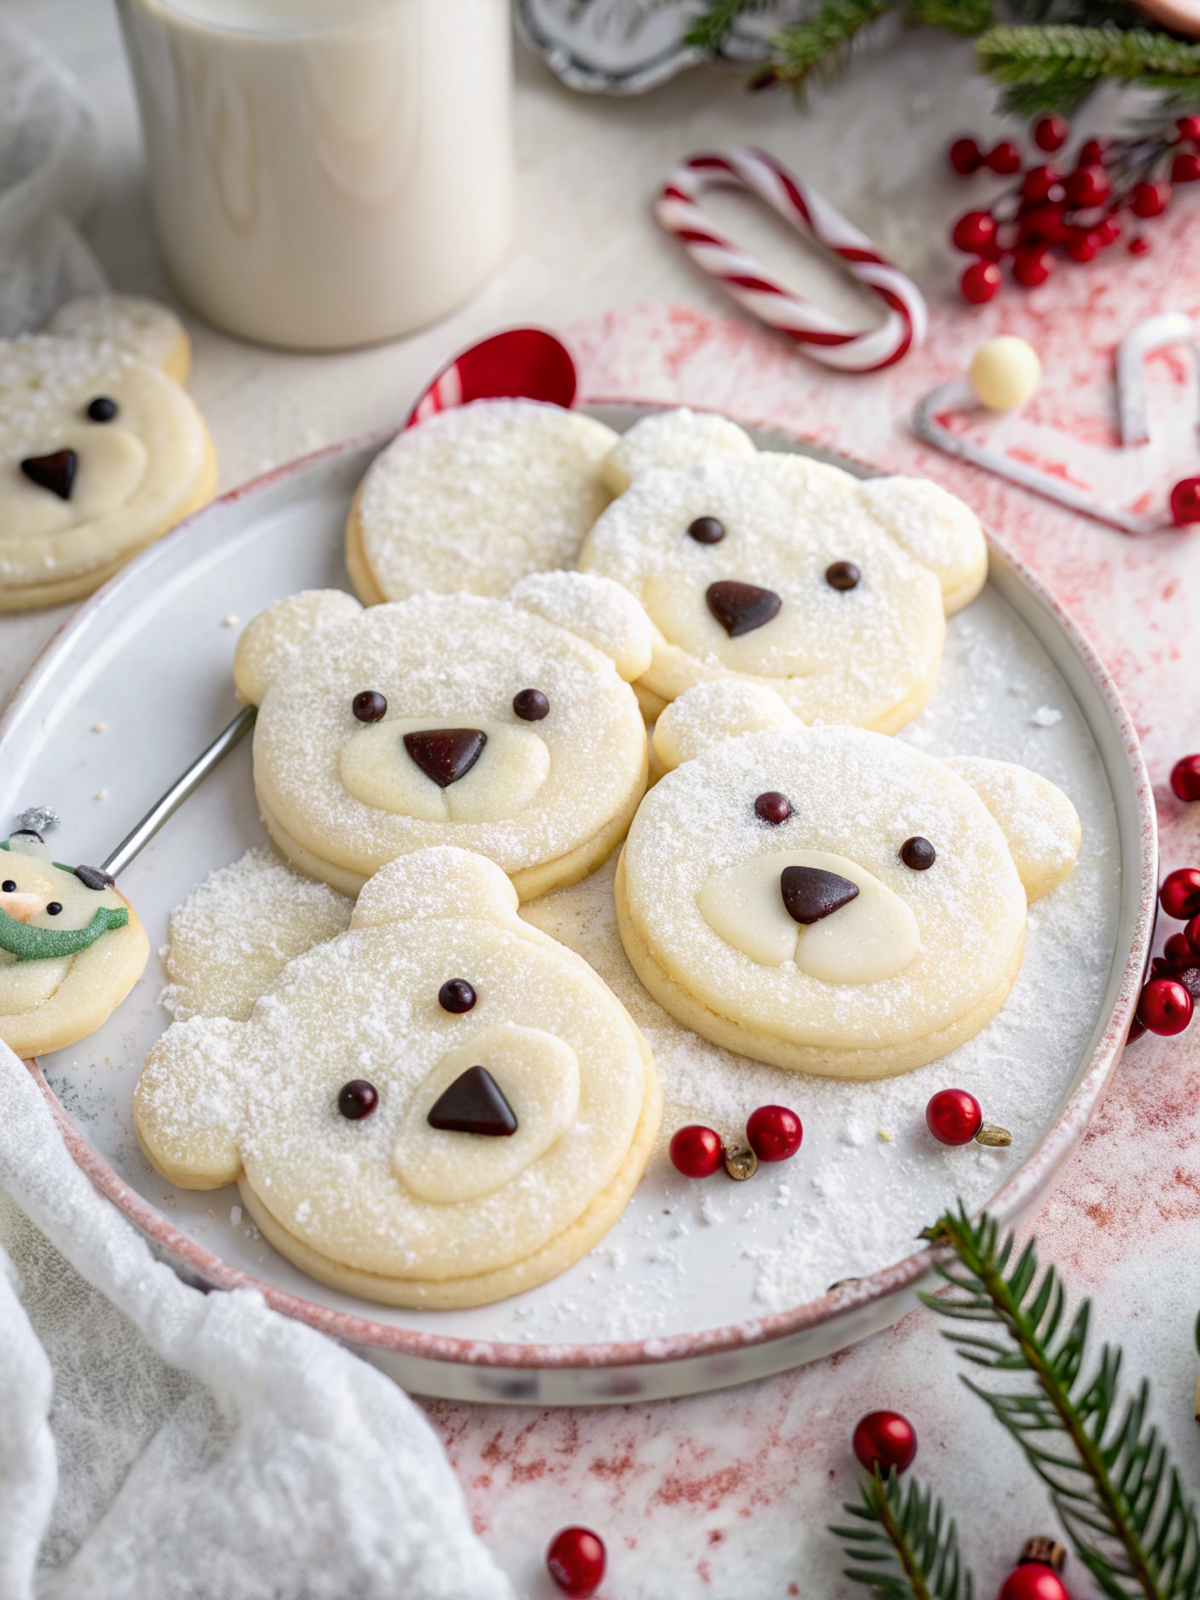
These Polar Bear Cookies are the sweetest winter treat — soft, buttery cookies topped with creamy vanilla frosting and decorated to look like cozy, fluffy polar bears. They’re fun to make, beautiful to serve, and absolutely delicious. The cookie base is tender and buttery from the combination of cream cheese + butter, giving the cookies a melt-in-your-mouth texture. The vanilla frosting adds smooth sweetness, and the chocolate chips and sprinkles turn each cookie into a cute little polar bear face.
These cookies are perfect for:
- Christmas cookie trays
- Snow day baking
- Winter parties
- Baking with kids
- Gut-warming cozy treats
They look adorable — but they taste even better.
🧰 Equipment Needed
- Mixing bowls
- Hand mixer or stand mixer
- Rubber spatula
- Measuring cups & spoons
- Baking sheet
- Parchment paper
- Cooling rack
- Small piping bag or spoon for frosting
🛒 Ingredients
For the Cookies
- 1 ¾ cups unsalted butter, softened
- ½ cup full-fat cream cheese, softened
- 1 ½ cups granulated sugar
- 1 large egg (room temperature)
- 5 teaspoons vanilla extract
- 3 cups all-purpose flour
- ½ teaspoon baking powder
- 1 tablespoon cornstarch
- 1 teaspoon fine salt
For Decorating
- 3 ½ cups powdered sugar
- ¼ cup heavy whipping cream (to adjust frosting consistency)
- 1 cup coarse sanding sugar (for the fluffy polar bear fur)
- 30 chocolate chips (for the noses)
- Black round sprinkles (for the eyes)
- Red or pink round sprinkles (for cheeks or nose detail)
👩🍳 Directions
Make the Cookies
Step 1:
Preheat your oven to 350°F (180°C). Line a baking sheet with parchment paper.
Step 2:
In a mixing bowl, beat together the softened butter and cream cheese until smooth and creamy.
Step 3:
Add the granulated sugar and beat again for 1–2 minutes until fluffy.
Step 4:
Add the egg and vanilla extract. Mix well.
Step 5:
In a separate bowl, whisk together the flour, baking powder, cornstarch, and salt.
Step 6:
Gradually add the dry ingredients to the wet mixture. Mix gently until a soft dough forms.
Step 7:
Roll the dough into small balls (about 1.5 tablespoons each) and place on the baking sheet.
Step 8:
Bake for 9–12 minutes, or until the tops look set but not browned.
(Cookies should stay pale — we want that soft polar bear look!)
Step 9:
Let cookies cool completely before decorating.
Make the Frosting & Decorate
Step 1:
In a bowl, mix the powdered sugar and heavy whipping cream until smooth.
Adjust texture:
- Add more powdered sugar if too thin
- Add a drop of cream if too thick
Step 2:
Spread or pipe frosting onto the cooled cookies.
Step 3:
Press each frosted cookie lightly into coarse sanding sugar to coat and create the “fur.”
Step 4:
Add one chocolate chip to the lower center for the nose.
Step 5:
Use black sprinkles for eyes.
Step 6:
Place red or pink sprinkles to create cute rosy cheeks or a tiny accent nose.
Your polar bear faces should now be smiling back at you 🐻❄️
🍽️ Servings & Timing
- Servings: About 24–30 cookies
- Prep Time: 15 minutes
- Bake Time: 9–12 minutes
- Decorating Time: 10–20 minutes
- Total Time: ~35–45 minutes
🧊 Storage & Reheating
- Store in an airtight container at room temperature for 3–4 days.
- Refrigerate for up to 1 week.
- Freeze undecorated cookies for 2 months.
- Freeze decorated cookies by layering with parchment.
🥄 Variations
- Brown Bear Version: Use brown sugar in dough + cocoa frosting.
- Peppermint Winter Bear: Add ½ teaspoon peppermint extract to frosting.
- Holiday Bears: Add mini scarves using colored icing.
- Snowflake Sparkle: Mix edible glitter into sanding sugar for shimmer.
❓ 10 FAQs
- Can I skip the cream cheese?
No — it’s what makes the cookies soft and creamy. - Can I make these ahead?
Yes — dough and cookies freeze well. - Why did my cookies spread?
Dough may have been warm — chill 15 minutes before baking. - Can I use store-bought icing?
Yes, but homemade has better structure. - Can I use flavored extract instead of vanilla?
Almond or coconut extract works beautifully. - Can kids help decorate?
Yes — this is a perfect kid-friendly recipe. - Can I use margarine?
Not recommended — butter gives essential flavor. - Do I need sanding sugar?
No — but it gives the fur texture look. - Can I double the recipe?
Yes — just double everything. - Can I use chocolate chips for the eyes too?
Yes — mini chocolate chips are perfect.
🏁 Conclusion
These Polar Bear Cookies bring pure winter joy — soft, sweet, fluffy, adorable, and full of personality. Whether you’re baking for holiday trays, parties, or a cozy day at home, these cookies make everyone smile. They’re fun to decorate, wonderful to share, and delicious to eat.
Bake them. Enjoy them. And let your kitchen feel like a snowy wonderland.
Polar Bear Cookies – Soft, Sweet & Adorably Frosted
Ingredients
✨ Kitchen Essentials You’ll Love
Quick picks I trust for better results, faster prep, and easier cleanup.
-
🍳View ↗
Lodge Seasoned Cast Iron Skillet
-
⚡View ↗
Instant Pot Duo Plus 9-in-1 Electric
-
🔥View ↗
CHEFMAN Digital Air Fryer XL 10L
Disclosure: As an Amazon Associate, I earn from qualifying purchases at no extra cost to you.
Equipment
Method
- Make the Cookies
- Preheat your oven to 350°F (180°C). Line a baking sheet with parchment paper.
- In a mixing bowl, beat together the softened butter and cream cheese until smooth and creamy.
- Add the granulated sugar and beat again for 1–2 minutes until fluffy.
- Add the egg and vanilla extract. Mix well.
- In a separate bowl, whisk together the flour, baking powder, cornstarch, and salt.
- Gradually add the dry ingredients to the wet mixture. Mix gently until a soft dough forms.
- Roll the dough into small balls (about 1.5 tablespoons each) and place on the baking sheet.
- Bake for 9–12 minutes, or until the tops look set but not browned.
- (Cookies should stay pale — we want that soft polar bear look!)
- Let cookies cool completely before decorating.
- Make the Frosting & Decorate
- In a bowl, mix the powdered sugar and heavy whipping cream until smooth.
- Adjust texture:
- Add more powdered sugar if too thin
- Add a drop of cream if too thick
- Spread or pipe frosting onto the cooled cookies.
- Press each frosted cookie lightly into coarse sanding sugar to coat and create the “fur.”
- Add one chocolate chip to the lower center for the nose.
- Use black sprinkles for eyes.
- Place red or pink sprinkles to create cute rosy cheeks or a tiny accent nose.
- Your polar bear faces should now be smiling back at you 🐻❄️
Notes
No — it’s what makes the cookies soft and creamy. Can I make these ahead?
Yes — dough and cookies freeze well. Why did my cookies spread?
Dough may have been warm — chill 15 minutes before baking. Can I use store-bought icing?
Yes, but homemade has better structure. Can I use flavored extract instead of vanilla?
Almond or coconut extract works beautifully. Can kids help decorate?
Yes — this is a perfect kid-friendly recipe. Can I use margarine?
Not recommended — butter gives essential flavor. Do I need sanding sugar?
No — but it gives the fur texture look. Can I double the recipe?
Yes — just double everything. Can I use chocolate chips for the eyes too?
Yes — mini chocolate chips are perfect. 🏁 Conclusion These Polar Bear Cookies bring pure winter joy — soft, sweet, fluffy, adorable, and full of personality. Whether you’re baking for holiday trays, parties, or a cozy day at home, these cookies make everyone smile. They’re fun to decorate, wonderful to share, and delicious to eat. Bake them. Enjoy them. And let your kitchen feel like a snowy wonderland.