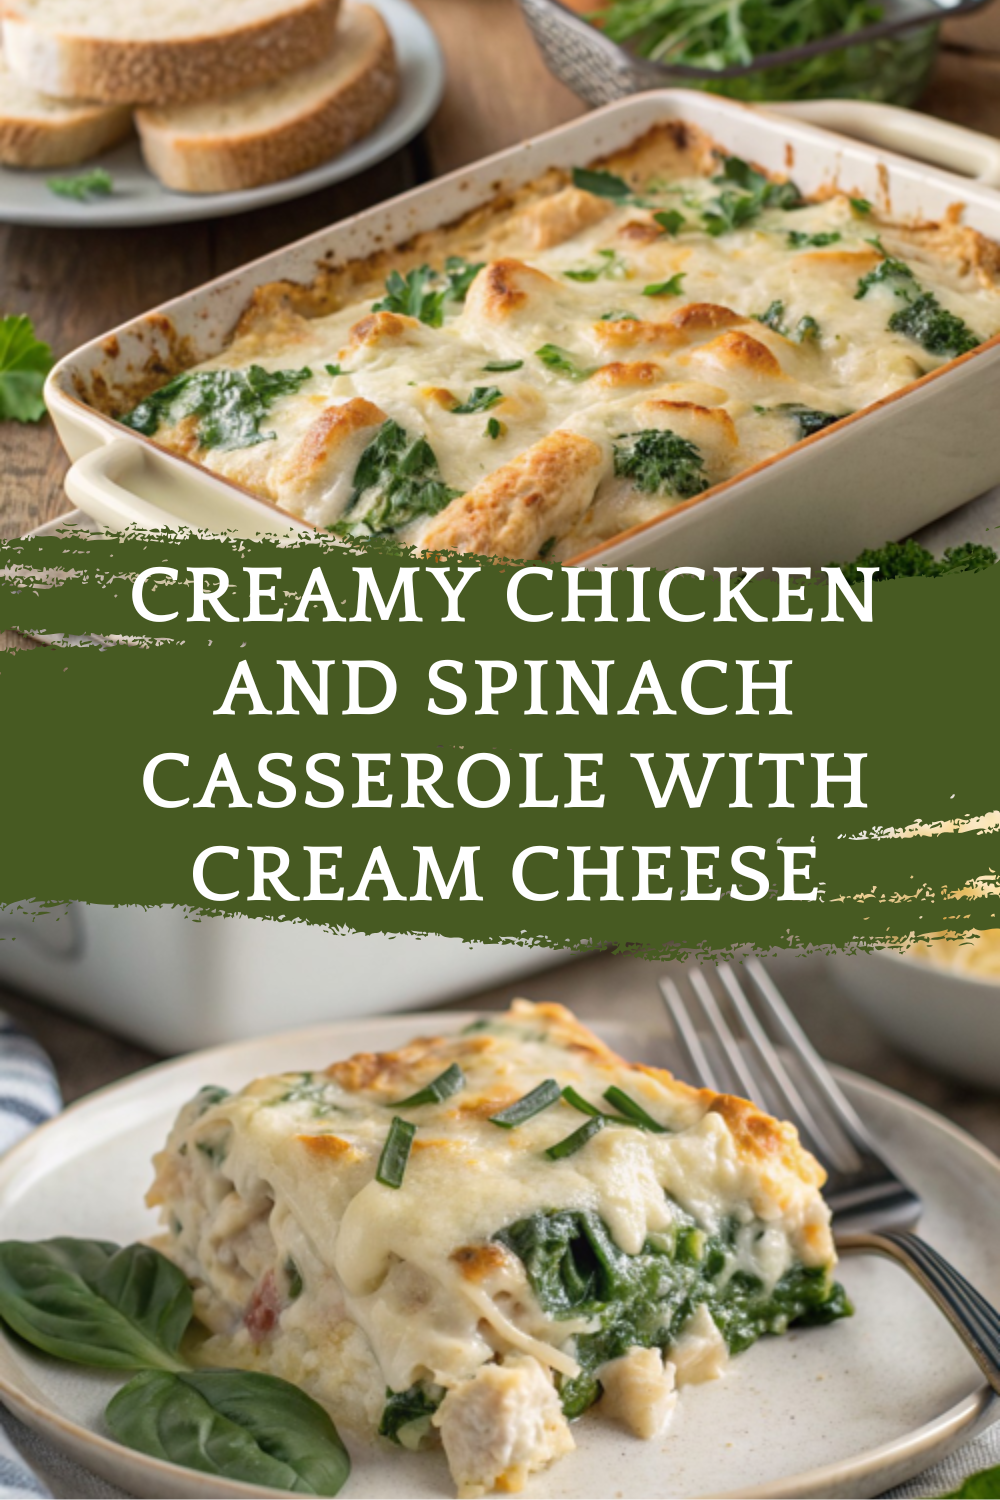
🎉 Introduction
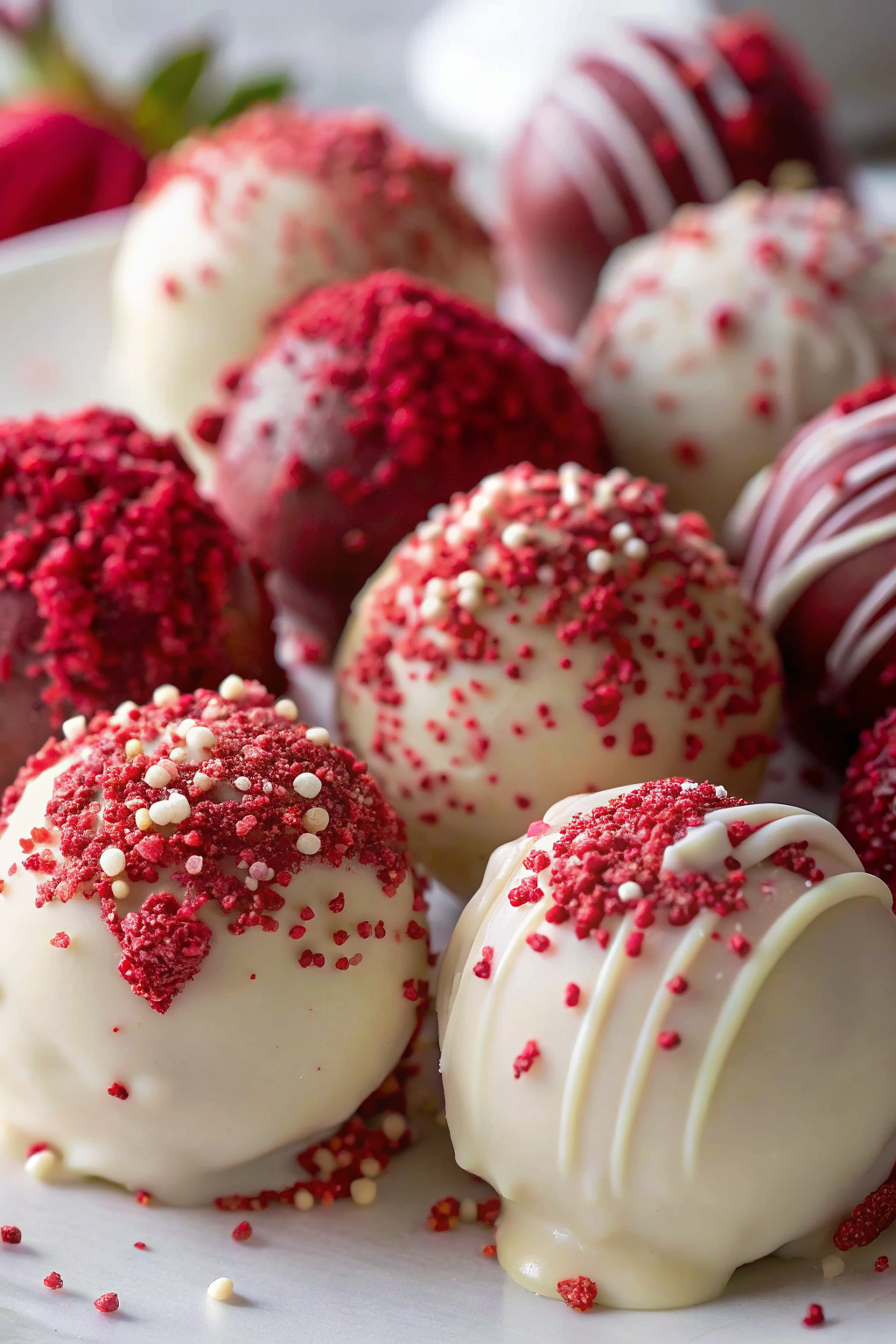
Few desserts are as elegant, eye-catching, and universally loved as Red Velvet Cake Balls. With their deep red color, rich cocoa flavor, and creamy center, these bite-sized treats are perfect for celebrations, holidays, parties, or simply when you want a sweet indulgence without baking an entire cake.
Red velvet cake balls combine the moist texture of red velvet cake with a smooth, slightly tangy cream cheese filling, all coated in a delicate chocolate shell. They’re easy to make, fun to decorate, and ideal for gifting or serving at events. Best of all, they require no advanced baking skills, making them perfect for beginners and experienced bakers alike.
Whether you’re preparing desserts for a special occasion or looking for a make-ahead sweet treat, these cake balls deliver big flavor in small bites.
🧰 Equipment Needed
To make these red velvet cake balls smoothly, prepare the following tools:
- Mixing bowls (large and medium)
- Electric mixer or hand mixer
- Baking sheet
- Parchment paper
- Cookie scoop or tablespoon
- Fork or dipping tool
- Microwave-safe bowl
- Cooling rack
- Spatula
🛒 Ingredients
These simple ingredients come together to create soft, flavorful, and beautifully coated cake balls.
For the Cake Base
- 1 red velvet cake (baked and cooled, homemade or boxed)
- 8 oz cream cheese, softened
For the Coating
- 2 cups white chocolate or chocolate coating melts
Optional Decorations
- White chocolate drizzle
- Red sprinkles
- Crushed cake crumbs
👩🍳 Directions
Step 1: Prepare the Cake
Bake the red velvet cake according to instructions and allow it to cool completely. Once cooled, crumble the cake into fine crumbs using your hands or a fork.
Step 2: Mix with Cream Cheese
Add the softened cream cheese to the cake crumbs. Mix thoroughly until the mixture is smooth, moist, and holds together when pressed.
Step 3: Shape the Cake Balls
Using a cookie scoop or tablespoon, scoop out portions of the mixture and roll them into smooth balls using your hands. Place them on a parchment-lined baking sheet.
Step 4: Chill the Cake Balls
Refrigerate the cake balls for at least 30 minutes until firm. This helps them hold their shape during coating.
Step 5: Melt the Chocolate
In a microwave-safe bowl, melt the chocolate coating in short intervals, stirring between each until smooth and fully melted.
Step 6: Coat the Cake Balls
Dip each chilled cake ball into the melted chocolate, using a fork to lift it out. Gently tap off excess chocolate.
Step 7: Decorate
While the coating is still wet, add sprinkles or drizzle with extra chocolate if desired.
Step 8: Set and Serve
Allow the cake balls to set at room temperature or refrigerate until the coating is firm.
🍽️ Servings & Timing
- Servings: 20–24 cake balls
- Preparation Time: 25 minutes
- Chilling Time: 30 minutes
- Total Time: About 1 hour
These are perfect for prepping ahead and serving when needed.
🧊 Storage & Reheating
- Store cake balls in an airtight container in the refrigerator for up to 5 days.
- For longer storage, freeze for up to 2 months.
- Serve chilled or allow to sit at room temperature for 10 minutes before serving.
- Reheating is not required.
🥄 Variations
Customize your red velvet cake balls with these ideas:
- Chocolate-Coated: Use dark or milk chocolate instead of white.
- Festive Style: Match sprinkles to holidays or events.
- Mini Cake Pops: Insert sticks before coating for cake pops.
- Extra Creamy Center: Add an extra tablespoon of cream cheese.
- Crunchy Finish: Roll in crushed cookies or nuts before coating sets.
❓ 10 FAQs
- Do I need to bake a cake from scratch?
No, a boxed red velvet cake works perfectly. - Why chill the cake balls before coating?
Chilling prevents them from falling apart during dipping. - Can I use frosting instead of cream cheese?
Cream cheese gives the classic red velvet flavor. - Can kids help with this recipe?
Yes, rolling and decorating is kid-friendly. - What chocolate coats best?
Chocolate coating melts or baking chocolate work best. - Can I make them ahead of time?
Yes, they’re great for advance preparation. - Why is my mixture too soft?
Add a little more cake crumb and chill longer. - Can I color the coating?
Yes, use food-safe coloring with white chocolate. - Do they need to be refrigerated?
Yes, due to the cream cheese filling. - Are these good for gifting?
Absolutely—they travel well and look beautiful.
🏁 Conclusion
These Red Velvet Cake Balls are the perfect combination of rich flavor, smooth texture, and bite-sized elegance. Easy to prepare and endlessly customizable, they’re ideal for parties, gifts, or anytime you want a dessert that feels special without being complicated.
Once you make them, they’ll quickly become a go-to dessert in your kitchen.
Red Velvet Cake Balls – Bite-Sized, Creamy, and Perfectly Irresistible
Ingredients
✨ Kitchen Essentials You’ll Love
Quick picks I trust for better results, faster prep, and easier cleanup.
-
🍳View ↗
Lodge Seasoned Cast Iron Skillet
-
⚡View ↗
Instant Pot Duo Plus 9-in-1 Electric
-
🔥View ↗
CHEFMAN Digital Air Fryer XL 10L
Disclosure: As an Amazon Associate, I earn from qualifying purchases at no extra cost to you.
Equipment
Method
- Bake the red velvet cake according to instructions and allow it to cool completely. Once cooled, crumble the cake into fine crumbs using your hands or a fork.
- Add the softened cream cheese to the cake crumbs. Mix thoroughly until the mixture is smooth, moist, and holds together when pressed.
- Using a cookie scoop or tablespoon, scoop out portions of the mixture and roll them into smooth balls using your hands. Place them on a parchment-lined baking sheet.
- Refrigerate the cake balls for at least 30 minutes until firm. This helps them hold their shape during coating.
- In a microwave-safe bowl, melt the chocolate coating in short intervals, stirring between each until smooth and fully melted.
- Dip each chilled cake ball into the melted chocolate, using a fork to lift it out. Gently tap off excess chocolate.
- While the coating is still wet, add sprinkles or drizzle with extra chocolate if desired.
- Allow the cake balls to set at room temperature or refrigerate until the coating is firm.
Notes
No, a boxed red velvet cake works perfectly. Why chill the cake balls before coating?
Chilling prevents them from falling apart during dipping. Can I use frosting instead of cream cheese?
Cream cheese gives the classic red velvet flavor. Can kids help with this recipe?
Yes, rolling and decorating is kid-friendly. What chocolate coats best?
Chocolate coating melts or baking chocolate work best. Can I make them ahead of time?
Yes, they’re great for advance preparation. Why is my mixture too soft?
Add a little more cake crumb and chill longer. Can I color the coating?
Yes, use food-safe coloring with white chocolate. Do they need to be refrigerated?
Yes, due to the cream cheese filling. Are these good for gifting?
Absolutely—they travel well and look beautiful. 🏁 Conclusion These Red Velvet Cake Balls are the perfect combination of rich flavor, smooth texture, and bite-sized elegance. Easy to prepare and endlessly customizable, they’re ideal for parties, gifts, or anytime you want a dessert that feels special without being complicated. Once you make them, they’ll quickly become a go-to dessert in your kitchen.